Toggle navigation
首页
问答
文章
积分商城
专家
专区
更多专区...
文档中心
返回主站
搜索
提问
会员
中心
登录
注册
python
测试
pytest
python 测试框架之 pytest 进击篇
发布于 2021-03-11 11:42:57 浏览:1155
订阅该版
[tocm]  > 之前紧凑慢凑强行拼凑出了一个测试文件夹,内含好多函数得测试代码。 > > 现在腾出手来了,发现之前写的,[python的测试框架 - pytest 简版教程](https://blog.csdn.net/weixin_37598106/article/details/110677387) > > 阅读之后就是这种感觉:嗯??我是谁?我在哪?我在干什么? > > 我怎么把测试数据和测试代码写在一块了? > > 改改改。 > > 提前恭喜通篇看完的你,恭喜你的脑子已经掌握了 pytest 的大部分知识点[撒花] # 0x01 pytest 的进一步学习 ## 1. 初衷 之前的测试用例中,数据和测试函数紧耦合,感觉就像将破碎的盘子强行用胶水粘在一起, 根本没有利用到 `pytest` 的强大之处 - **fixture**。也没有符合 `python` 的美学。。。 这一回抽个时间,好好的捋一捋,如何用 `pytest` 写项目测试 之前是明白了 `pytest` 得功能以及使用方法,现在尝试与具体得实际项目结合。 这篇文章主要目的是将测试用例和测试代码分离开,顺便记录一下新学得知识 ## 2. 之前写的代码 > 该处我用的是折叠手法,但是论坛编辑器不支持折叠,请各位看官直接往下拉就好 被测函数:download_from_gitlab() ```python3 def download_from_gitlab(url, cwd): # filename of downloading file down_file = os.path.basename(url) # compress filename zip_name = os.path.join(down_file, "SConscript.zip") # if the file is existed, delete it first. if os.path.exists(down_file): shutil.rmtree(down_file, onerror=readonly_handler) cmd = "git clone {}".format(url) down_status = subprocess.call(cmd) if down_status != 0: raise Exception("Failed download from gitlab???") logging.info("Download files from gitlab successfully...") # unzip, if file have unzipped, the files would be overwritten by the # downloaded files and the original file would be retained try: with zipfile.ZipFile(zip_name, "r") as zip_ref: zip_ref.extractall(cwd) except Exception: raise Exception("Failed to unzip???") # remove dir, there is "shared_files" shutil.rmtree(down_file, onerror=readonly_handler) logging.info("Removing the downloaded files successfully...") return ``` 原本的测试函数: ```python import os import sys sys.path.append("..") import shutil import pytest from download_files import download_from_gitlab def readonly_handler(func, path, ): # Change the mode of file, to make it could be used of shutil.rmtree os.chmod(path, 128) func(path) def setup_function(): """ 在测试之前生成 tmp_cwd 文件夹,存放从gitlab中下载的文件""" # 在每一个测试函数之前运行 os.mkdir("tmp_cwd") def teardown_function(): """ 在测试之后删除 tmp_cwd 文件夹""" shutil.rmtree("tmp_cwd", onerror=readonly_handler) @pytest.mark.parametrize("url, cwd", [("https://gitee.com/lebhoryi/shared_files", "tmp_cwd")]) # true true def test_download_from_gitlab(url, cwd): # 正常流 _ = download_from_gitlab(url, cwd) file_list = ["Middlewares", "RT-AI", "X-CUBE-AI"] for file in file_list: assert os.path.exists(os.path.join(cwd, file)) if __name__ == "__main__": pytest.main(["-q", "-s", f"{__file__}"]) ``` 在原本的测试函数中,仅用到了三个点: - [x] `setup_function()` 每一个测试函数之前运行 - [x] `teardown_function()` 每一个测试函数结束之后运行 - [x] `@pytest.mark.parametrize()` 传参 ## 3. 想要的几个功能 - 进阶学习 > 本章节之后都是按照功能先后来排版的 - [x] 将被测代码中的 `raise` 或者 `assert` 的测试结果显示为 `xfail `,而不是 `.` 表示。 - [x] 有一些被测函数运行之前需要另外的函数,比如创建一个文件夹,但是我只想运行一次,而不是每一个测试用例都运行。体现在作用域 - [x] 取消 `setup` 和 `teardown` 写法,转用 `pytest` 独创写法,利用 `fixture` 装饰器 - [x] 测试数据和测试代码分离,*我贼想要掌握的一个点* - [x] 共享的 `fixture`, 举个例子,我有多个测试文件,要共用一个创建文件夹的函数,就需要这个了,利用 `conftest.py` - [x] 利用 `pytest.ini` ## 4. pytest 常用的几个参数  ```python # pytest_test2.py import pytest def test_pass(): print("这是打印的信息") assert 5 == 5 ```  [外链图片转存失败,源站可能有防盗链机制,建议将图片保存下来直接上传(img-a6nzp7B6-1615431677270)(C:\Users\12813\AppData\Roaming\Typora\typora-user-images\image-20210310110815478.png)] # 0x02 xfail 我需要检测出被测代码中的 `assert` 或者 `raise` 异常,并且输出为 `xfail`,而不是全部输出为 `.` ## 1. 六个输出结果 在 `xfail ` 中有六个测试结果输出,分别是:  ## 2. 代码 ```python # pytest_test2.py import pytest @pytest.mark.xfail() def test_pass(): assert 2 == 5 @pytest.mark.xfail() def test_pass2(): assert 5 == 5 ```  ## 3. 其他 `xfail` 的一些参数:[详细请看官方文档](https://www.osgeo.cn/pytest/skipping.html) - condition, 必须搭配 reason 只在windows 运行的测试用例: ```python @pytest.mark.xfail(sys.platform == "win32", reason="bug in a 3rd party library") def test_function(): ... ``` - reason - raises - run - ... # 0x03 有些函数只需要运行一次 我有多个测试数据,正常的和异常的测试数据。在测试函数执行之前,我需要先创建一个文件夹来储存测试代码的运行结果。(杠精别问为什么不用临时文件,这是例子,例子,例子) 那么,我想要实现的是:仅创建一个储存的文件夹即可,而非每运行一个测试用例需要创建一次。 用专业的话来说,就是:每个 `module` 的所有 `test` 只运行一次,`@pytest.fixture(scope=module)` 这时候用的是 `fixture` 中的作用域。 ## 1. fixture 作用域  ## 2. 代码 ```python # pytest_test2.py import pytest @pytest.fixture(scope="module", autouse=True) def mod_head(): print(f"module\t: {mod_head.__name__}") @pytest.fixture(scope="function", autouse=True) def func_head(): print(f"func\t: {func_head.__name__}") @pytest.mark.xfail() def test_pass(): print("这是打印的信息") assert 2 == 5 def test_pass2(): assert 5 == 5 ```  - `autouse=True` 时会自动调用这个 `fixture` ## 3. 其他 - 临时文件 你硬要说用临时文件夹,也不是不可以 有时候,在测试得过程中,需要创建临时文件夹,这时候就需要往下看了。 ### 3.1 pytest 中的四个临时文件对象 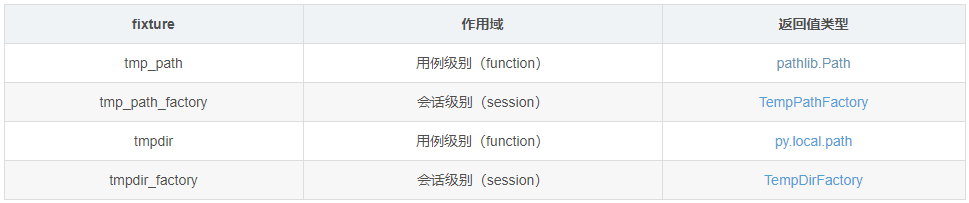 ### 3.2 tmp_path 实例 我常用得是 `pathlib.Path`,所以关注得 `tmp_path` 多了点 ```python # pytest_test2.py import pytest # 对的,在传入 tmp_path 这个参数得时候,不需要指定,pytest自带 def test_read_ini(tmp_path): a_dir = tmp_path / "mytmpdir" a_dir.mkdir() a_file = a_dir / "tmpfile.txt" a_file.write_text("hello, pytest!") assert a_file.read_text() == "hello, pytest!" ``` > tmpdir 参考文档: [内置 fixtures 之 tmpdir](https://blog.csdn.net/waitan2018/article/details/104302454) ### 3.3 临时文件在哪 `pytest` 创建临时文件默认为系统的临时目录,`Windows` 为 `%temp%` 路径下,也可自己指定, `--basetemp` ```python pytest -q -s --basetemp='./tmp' pytest.py ``` **注意:** 临时文件最多为三个,最新的临时文件会替换最老的临时文件。 # 0x04 setup、teardown 转 fixture 为了兼容 `unittest` ,`pytest` 保留了 `setup_xxx` 和 `teardown_xxx`,其中 xxx 有四个选择:{function,module,method,class}。 这并非 `pytest` 推荐的写法。 `pytest` 推荐用的是 `fixture` + `yield` ## 1. 代码 `setup` 和 `teardown` 版 ```python # pytest_test.py import pytest def setup_module(): print("每个函数之前执行") def teardown_module(): print("\n每个函数之后执行") @pytest.mark.xfail() def test_pass(): assert 2 == 5 def test_pass2(): assert 5 == 5 ``` `fixture + yield` 版 ```python # pytest_test2.py import pytest @pytest.fixture(scope="module") def func(): print("每个函数之前执行") yield print("\n每个函数之后执行") @pytest.mark.xfail() def test_pass(func): assert 2 == 5 def test_pass2(func): assert 5 == 5 ``` 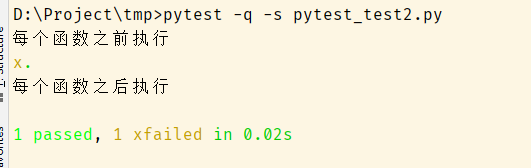 # 0x05 测试数据和测试代码分离 之前的掌握的两种喂测试数据的方式: - [pytest.mark.parametrize](##1. mark.parametrize) - [pytest.fixture(params)](##2. fixture(param=xxx)) ## 1. mark.parametrize 中文:标记参数 将测试数据和测试代码紧密联系 ```python # pytest_test2.py import pytest def add(a, b): return a+b @pytest.mark.parametrize("a, b, result", [(1, 2, 3), (10, 20, 30)]) def test_pass(a, b, result): assert add(a, b) == result @pytest.mark.xfail() @pytest.mark.parametrize("a, b, result", [(1, 2, 5)]) def test_xfail(a, b, result): assert add(a, b) == result ```  **进阶**:(初级版数据分离) ```python # pytest_test2.py import pytest def add(a, b): return a+b add_list = [(1, 2, 3), (10, 20, 30)] @pytest.mark.parametrize("a, b, result", add_list) def test_pass(a, b, result): assert add(a, b) == result ```  **注意:** 1. `@pytest.mark.parametrize` 中的第一个参数是字符串,不是多个字符串 2. `@pytest.mark.parametrize` 中的第二个参数是列表,**一个测试数据用一个元组表示**,有几个测试数据就有几个元组 **其他:** ```shell @pytest.mark.parametrize(self,argnames, argvalues, indirect=False, ids=None, scope=None)) ```  ## 2. fixture(param=xxx) 中文:固件参数 ```python # pytest_test2.py import pytest def add(a, b): return a+b add_list = [(1, 2, 3), (10, 20, 30)] @pytest.fixture(params=add_list) def get_param(request): return request.param def test_pass(get_param): assert sum(get_param[:2]) == get_param[2] ```  **注意:** 1. `request` 是 `pytest` 内置的固件,通过 `request.param` 获取参数,**不可随意命名** 2. 涉及到多个参数值传递,**建议用字典**,而不是列表 ## 3. 用外部文件传递测试数据 `pytest` 支持多种文件读取: - JSON - Yaml - Excel - CSV 详细的各种例子请戳:[Pytest 实战](https://cloud.tencent.com/developer/article/1730701) 本文以 `CSV` 举例。 在本地创建 `data.csv` 文件。注意看最后一个测试数据,是通过不了测试的!  ```python # pytest_test2.py import pytest import csv def read_csv(): result = list() with open("data.csv", "r+") as f: reader = csv.reader(f) next(reader) # 为了跳过首行 result = list(reader) return result @pytest.mark.parametrize("add_list", read_csv()) def test_csv_add(add_list): assert str(int(add_list[0]) + int(add_list[1])) == add_list[2] ``` 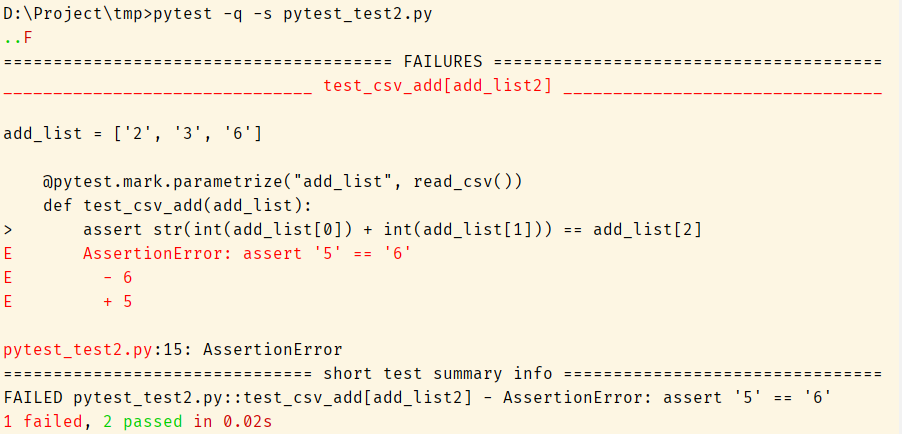 # 0x06 共享 fixture 当我拥有多个测试文件的时候,发现有部分函数是重复的,这就很违反 `python` 的美学了, 这时候,就要祭出 `conftest.py` 这个大杀器。将重复函数从测试文件中移出去,另成文件,能够被重复使用。 **千万不要引用!pytest 将会自动调用!** 默认你会注意文件作用域,仅作用当前文件夹以及子文件夹。 代码 > 拿 [0x04 setup、teardown 转 fixture](##1. 代码) 中的代码举例子 ```python # conftest.py 这是新的文件! import pytest @pytest.fixture(scope="module") def func(): print("每个函数之前执行") yield print("\n每个函数之后执行") ``` ```python # pytest_test2.py import pytest @pytest.mark.xfail() def test_pass(func): assert 2 == 5 def test_pass2(func): assert 5 == 5 ``` 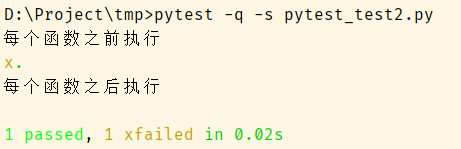 # 0x07 配置文件 假设有这么个场景,你在测试的时候经常要用到 `-q -s` ,然后又不想每次测试得时候手动输入这个, 懒人福音来了,在`pytest.ini` 里面设置即可 ## 1. pytest 运行时命令行参数 ```python [pytest] addopts = -q -s # 复杂且常用的命令行参数 # addopts = -rsxX -l --tb=short --strict ``` - `--rsxX` 表示 `pytest` 报告所有测试用例被跳过、预计失败、预计失败但实际通过的原因。 - `-l` 表示 `pytest` 报告所有失败测试的堆栈中的局部变量。 - `--tb=short` 表示简化堆栈回溯信息,只保留文件和行数。 - `--strict` 选项表示禁止使用未在配置文件中注册的标记。 ## 2. pytest 标记 为了防止你瞎标记、乱标记、输入拼写错误的标记 ```python [pytest] markers = smoke: Run the smoke test functions for tasks project get: Run the test functions that test tasks.get() ``` 通过使用 `pytest --markers` 查看 先设定好标记的内容,配合上面的 `--strict` 命令,那么,当你输入错误标记或者不认识的标记的时候,会报错 ## 3. 指定测试路径 ```shell [pytest] testpaths = pytest_tmp ``` ## 4. 其他 > 官方: [Configuration Options](https://docs.pytest.org/en/stable/reference.html#id90) - 最低版本号:`minversion = 3.0` - 忽略某些目录:`norecursedirs = build dist` - 禁用 XPASS,让 XPass 显示为 FAILED:`xfail_strict = true` 拿 [0x05 3. 用外部文件传递测试数据][##3. 用外部文件传递测试数据] 举例子,增加一行代码,  当我在 `pytest.ini` 中设置了 `xfail_strict = true` 之后的输出结果:  # 0x08 其他华丽的技巧啊 ## 1. 并发执行 用的是 `pytest-xdist` 插件 ```shell pytest -v -n 4 pytest_test.py pytest -v -n auto pytest_test.py ``` ## 2. 输出报告 常规输出报告: - JunitXML `pytest -v pytest_test.py --junitxml=report.xml` - log `pytest -v pytest_test.py --resultlog=log.txt` 需要安装第三方库的输出报告: - html ```shell pip install pytest-html pytest -v pytest_test.py --html=report.html ``` - Allure 参考:[Pytest之Allure测试报告(十五)](https://cloud.tencent.com/developer/article/1595180) # 0x09 参考文章 - [基于 Pytest 框架的自动化测试开发实践 (万字长文入门篇)](https://testerhome.com/topics/23441) - [6、pytest -- 临时目录和文件](https://blog.csdn.net/fyyaom/article/details/102737017?utm_medium=distribute.pc_relevant.none-task-blog-OPENSEARCH-7.control&dist_request_id=&depth_1-utm_source=distribute.pc_relevant.none-task-blog-OPENSEARCH-7.control) - [Pytest高级进阶之Fixture](https://www.jianshu.com/p/54b0f4016300) - [pytest中的fixture](https://note.qidong.name/2018/01/pytest-fixture/) - [Pytest实战](https://cloud.tencent.com/developer/article/1730701) - [11、Pytest之@pytest.mark.parametrize使用详解](https://blog.csdn.net/totorobig/article/details/112235358) - [Pytest之Allure测试报告(十五)](https://cloud.tencent.com/developer/article/1595180) - [pytest--配置](https://www.cnblogs.com/zouzou-busy/p/11323606.html)
0
条评论
默认排序
按发布时间排序
登录
注册新账号
关于作者
lebhoryi
这家伙很懒,什么也没写!
文章
30
回答
6
被采纳
1
关注TA
发私信
相关文章
1
关于free命令的测试和疑惑
2
如何测试一条指令的执行所需的时间?
3
utest 官方例程移植测试
4
请问我使用scons --target=mdk5命令出现下问题怎么解决
5
Python库的线程锁,在第一次执行后退出再次执行,就会断言死机
6
env 下脚本怎么实现编译的时候产生汇编文件
7
如何在RT-Thread中调用python程序?
8
编译固件前先执行python脚本
9
env还没支持python3吗?
10
import keras2onnx错误
推荐文章
1
RT-Thread应用项目汇总
2
玩转RT-Thread系列教程
3
国产MCU移植系列教程汇总,欢迎查看!
4
机器人操作系统 (ROS2) 和 RT-Thread 通信
5
五分钟玩转RT-Thread新社区
6
【技术三千问】之《玩转ART-Pi》,看这篇就够了!干货汇总
7
关于STM32H7开发板上使用SDIO接口驱动SD卡挂载文件系统的问题总结
8
STM32的“GPU”——DMA2D实例详解
9
RT-Thread隐藏的宝藏之completion
10
【ART-PI】RT-Thread 开启RTC 与 Alarm组件
热门标签
RT-Thread Studio
串口
Env
LWIP
SPI
AT
Bootloader
Hardfault
CAN总线
FinSH
ART-Pi
DMA
USB
文件系统
RT-Thread
SCons
RT-Thread Nano
线程
MQTT
STM32
FAL
RTC
rt-smart
I2C_IIC
cubemx
UART
ESP8266
WIZnet_W5500
BSP
ota在线升级
PWM
flash
packages_软件包
freemodbus
潘多拉开发板_Pandora
ADC
GD32
定时器
编译报错
flashDB
keil_MDK
socket
中断
rt_mq_消息队列_msg_queue
Debug
ulog
SFUD
msh
C++_cpp
at_device
本月问答贡献
出出啊
1524
个答案
343
次被采纳
小小李sunny
1444
个答案
290
次被采纳
张世争
818
个答案
179
次被采纳
crystal266
555
个答案
162
次被采纳
whj467467222
1222
个答案
149
次被采纳
本月文章贡献
出出啊
1
篇文章
1
次点赞
小小李sunny
1
篇文章
1
次点赞
张世争
1
篇文章
2
次点赞
crystal266
2
篇文章
1
次点赞
whj467467222
2
篇文章
1
次点赞
回到
顶部
发布
问题
投诉
建议
回到
底部


