Toggle navigation
首页
问答
文章
积分商城
专家
专区
更多专区...
文档中心
返回主站
搜索
提问
会员
中心
登录
注册
柿饼_PersimmonUI
[柿饼派]制作一个简易的桌面时钟+疫情数据实时更新列表
发布于 2020-02-29 17:28:43 浏览:5146
订阅该版
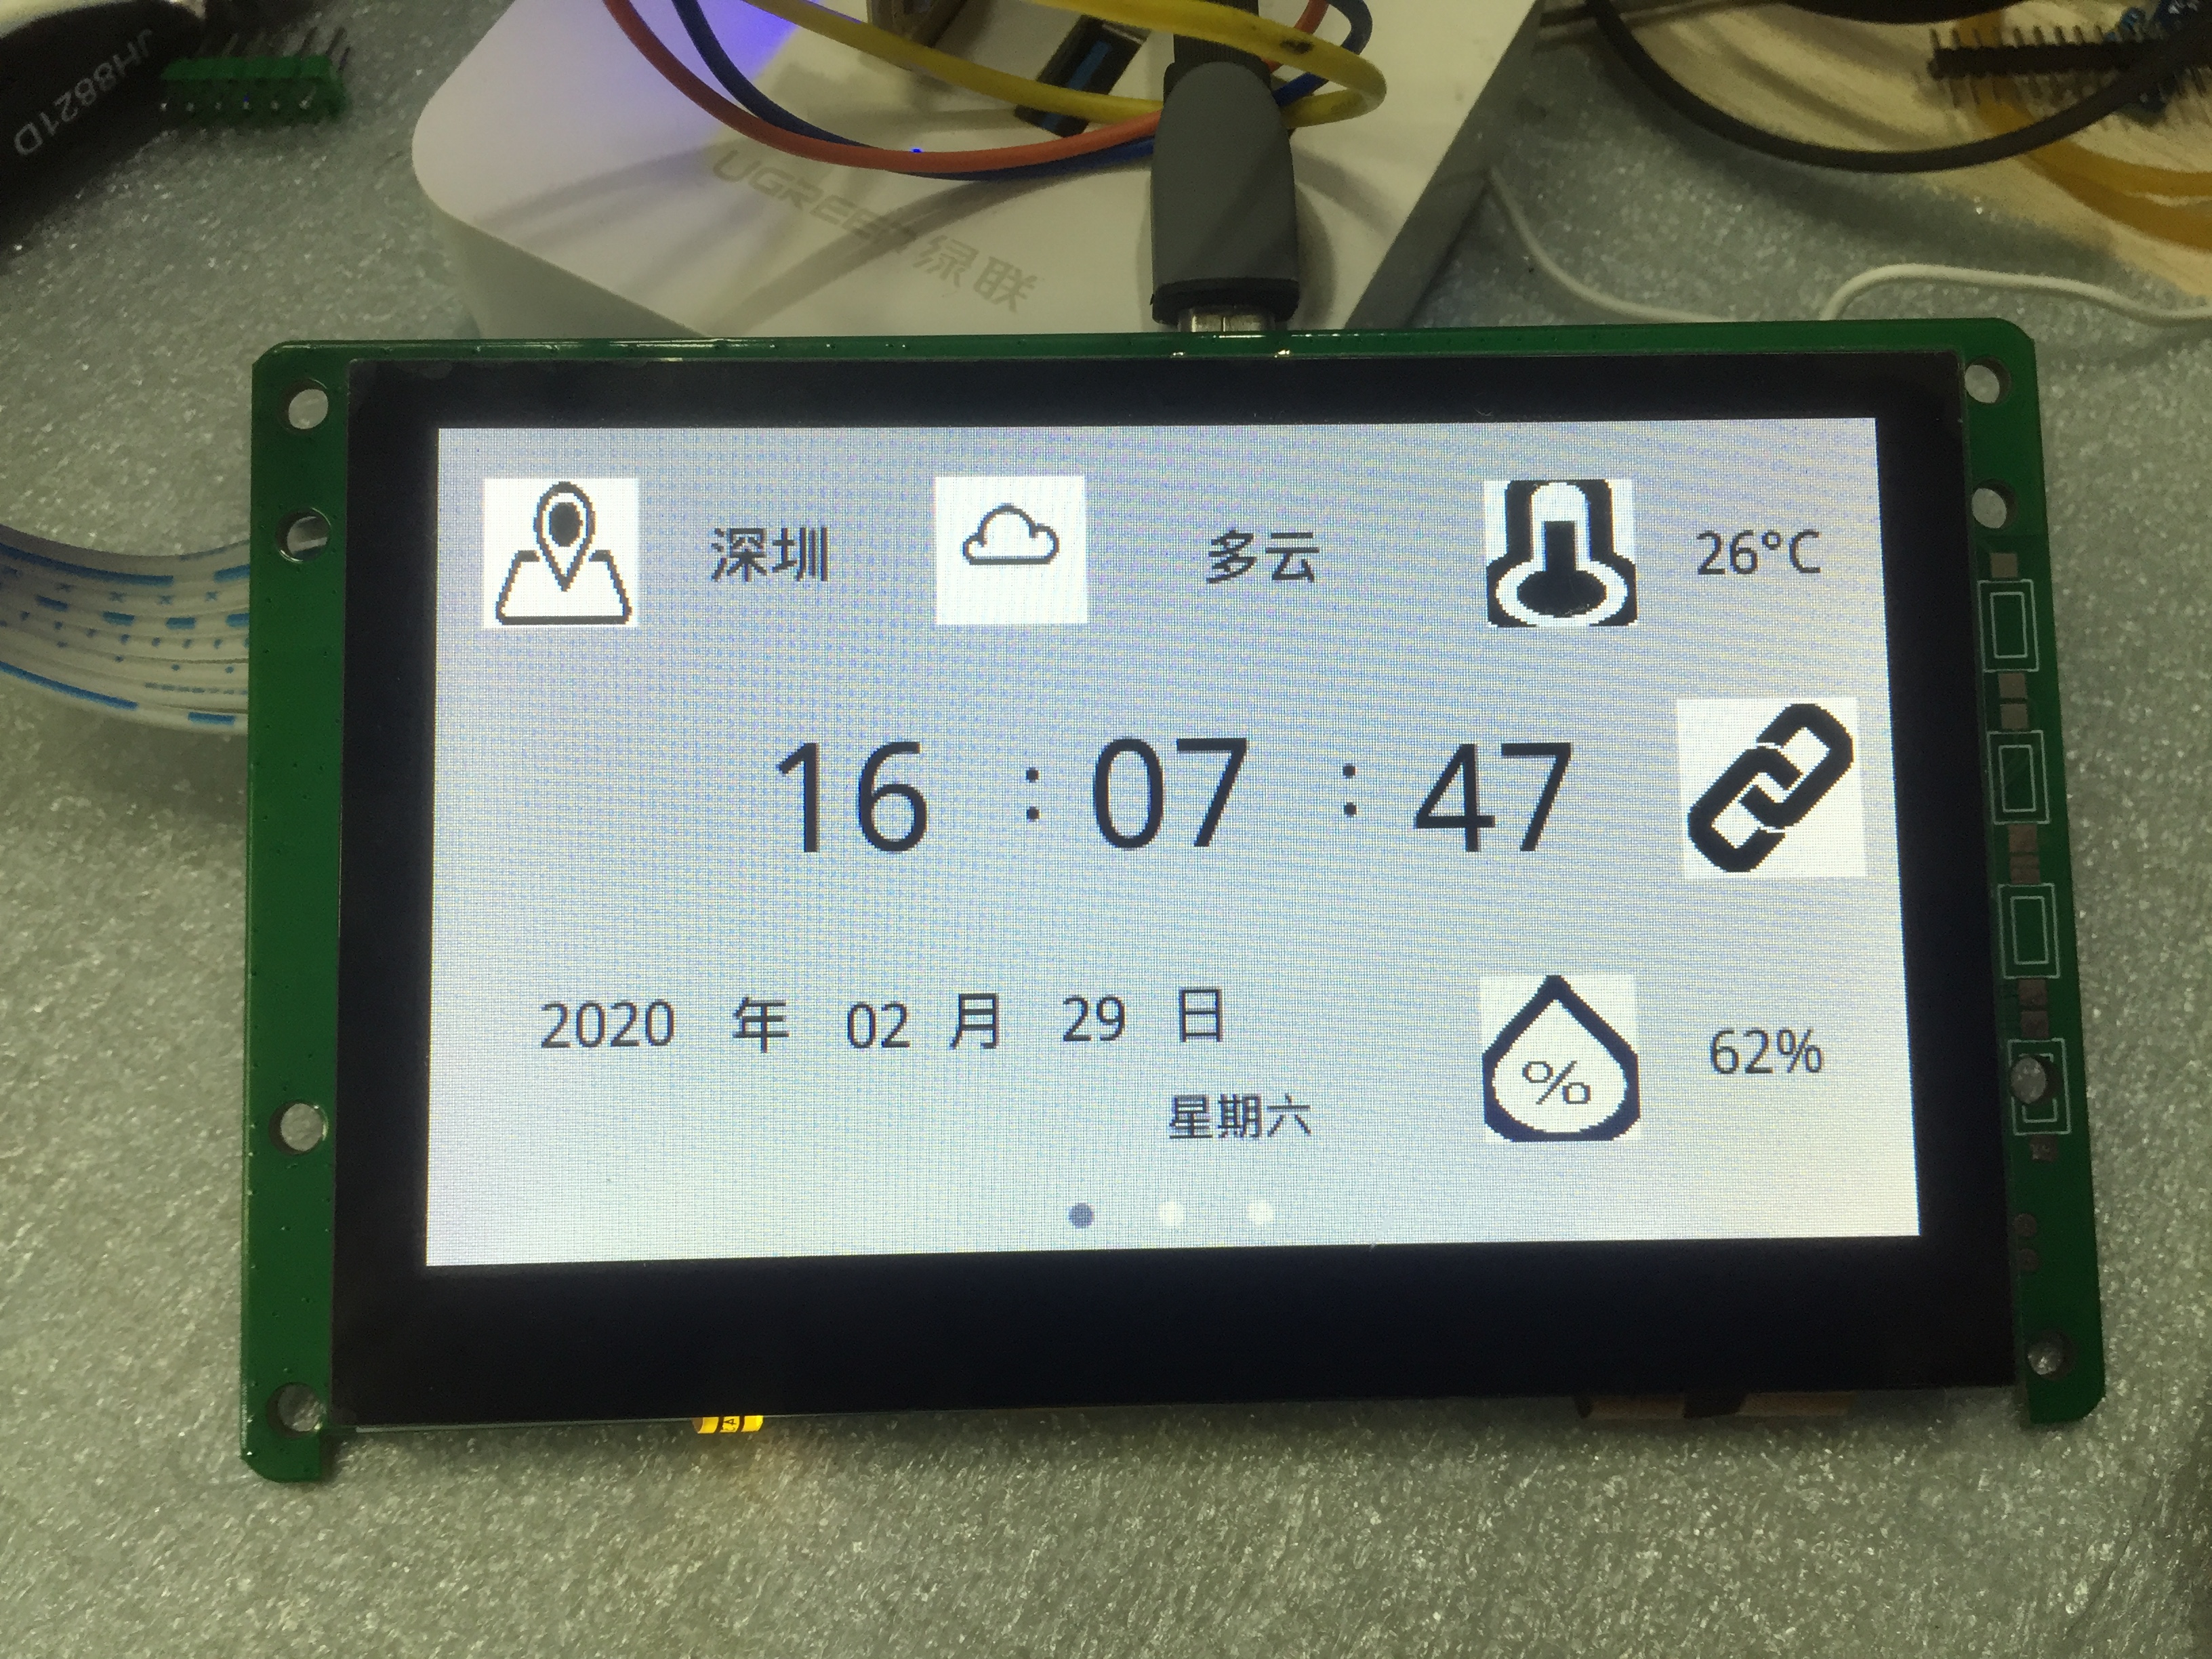
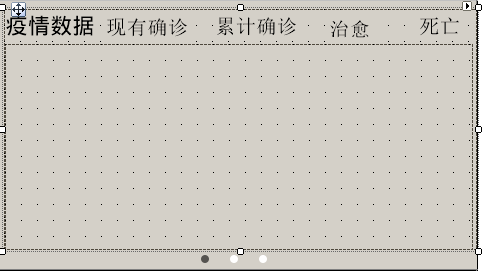
* 本帖最后由 shadowliang 于 2020-2-29 17:36 编辑 * 最近在入门学习柿饼派,看了一遍文档中心里面的资料和视频中心里面的教程,看了之后觉得要动手练练才能真正理解,于是东拼西凑制作了一个简易的桌面时钟+疫情数据实时更新列表的示例,share 一下。话不多说,先贴两张图。 [align=center] [align=center]桌面时钟效果 [align=center] [align=center]疫情数据列表 **简介**硬件:柿饼派软件:Persimmon UI Builder 数据来源:1.天气数据来自天气 api :[https://tianqiapi.com](https://tianqiapi.com)2.网络时钟数据来自: [http://quan.suning.com/getSysTime.do](http://quan.suning.com/getSysTime.do) 3.疫情数据来自:[https://lab.isaaclin.cn/nCoV/api/area?latest=1&province=%E5%B9%BF%E4%B8%9C%E7%9C%81](https://lab.isaaclin.cn/nCoV/api/area?latest=1&province=%E5%B9%BF%E4%B8%9C%E7%9C%81)**主要功能**1.可以实时更新指定地区的气象数据包括天气情况、温度、湿度2.可以通过网络校准时钟数据实时更新时钟。3.可以实时获取指定省份的最新的疫情数据。4.初次联网成功后会记录连接热点的信息,开机时自动重连。**实现过程*** UI 设计部分 UI 界面采用 2个 page 页面,其中page1 中放置 DotIndicator 控件card 控件,并在 card 控件中放置 3个 panel ,panel 1 为展示桌面时钟+天气信息,panel 2 为展示 WIFI 操作页面,在 panel2 中放置 listctrl 控件展示 附近 WiFi 信息并支持按钮触发连接 WiFi的操作,进入 page2 页面输入 WiFi 密码进行联网,panel3 中放置 listctrl 控件为展示疫情信息,可以通过左右滑动切换到不同的 panel 中,page2 中主要是 wifi 联网的密码输入界面,由 page1中的 panel2 页面中按钮触发进行切换。相关的界面如下:[align=center][align=center]page1_panel1 界面[align=center][align=center]page1_panel2 界面[align=center][align=center]page1_panel3 界面 * 数据更新部分 采用定时器定时发送请求,获得原始数据,对原始数据进行解析,把解析得到的数据展示到对应的页面中。下面是获取数据的核心代码。```//1.获取天气数据 getWeathearInfo:function(event) { var that = this; var str = 0; console.log("getWeathrerInfo....") var req1 = pm.request({ url: 'https://tianqiapi.com/api?version=v6&appid=31972938&appsecret=e3fvZnAN&city='+localcity, data:{ x:'', y:'' }, header:{ "Content-Type":"application/json", }, success:function(res) { console.log('request success'), console.log(res.data), console.log(res.statusCode) console.log("json_par") str = res.data.toString('utf8'); console.log(str) json_obj = JSON.parse(str); console.log(json_obj) week = json_obj.week; that.tempdataupdate(); }, complete:function() { console.log('request complete') }, fail:function(){ console.log('request failed') } }) }, //界面上更新对应的数据 tempdataupdate:function(){ console.log("<< tempdataupdate") this.setData({img_weather:{value:json_obj.wea_img+'.png',refresh : true}}) this.setData({hum_label :{value : json_obj.humidity,refresh : true}}); this.setData({tem_label :{value : json_obj.tem+"°C",refresh : true}}); this.setData({weather_label :{value : json_obj.wea,refresh : true}}); this.setData({week_label :{value : week,refresh : true}}); },``` 获取时间数据```getNetTimeInfo:function(){ var that = this; var str = 0; console.log("Get NetTimeInfo....") var req1 = pm.request({ url: 'http://quan.suning.com/getSysTime.do', data:{ x:'', y:'' }, header:{ "Content-Type":"application/json", }, success:function(res) { console.log('request success'), console.log(res.data), console.log(res.statusCode) console.log("json_par") str = res.data.toString('utf8'); console.log(str) json_obj1 = JSON.parse(str); console.log(json_obj1) console.log("systemtime:"+json_obj1.sysTime2) var temp = json_obj1.sysTime2.toString(); console.log("length:"+temp.length) console.log(temp) year = temp.substring(0,4); console.log(year) month = temp.substring(5,7); console.log(month) day = temp.substring(8,10); console.log(day) console.log(year+':'+month+':'+day); var nethour = temp.substring(11,13); hours = parseInt(nethour, 10); console.log(nethour); var netminutes = temp.substring(14,16); minutes = parseInt(netminutes, 10); console.log(netminutes); var netseconds = temp.substring(17,19); seconds = parseInt(netseconds, 10); console.log(netseconds) that.updateDate(); }, complete:function() { console.log('request complete') }, fail:function(){ console.log('request failed') } }) }, //更新界面的数据 updateDate:function() { this.setData({year_label :{value : year,refresh : true}}); this.setData({month_label :{value : month,refresh : true}}); this.setData({day_label :{value : day,refresh : true}}); },``` 获取疫情数据```//获取疫情数据 getrealData:function(){ var that = this; var str = 0; console.log("Get RealData....") var req1 = pm.request({ url: 'https://lab.isaaclin.cn/nCoV/api/area?latest=1&province=%E5%B9%BF%E4%B8%9C%E7%9C%81', data:{ x:'', y:'' }, header:{ "Content-Type":"application/json", }, success:function(res) { console.log('request success'), console.log(res.data), console.log(res.statusCode) str = res.data.toString('utf8'); console.log(str) json_obj2 = JSON.parse(str); console.log('省份'+json_obj2.results[0].provinceName) console.log('现有确诊数量'+json_obj2.results[0].currentConfirmedCount) console.log('累计确诊数量'+json_obj2.results[0].confirmedCount) console.log('治愈数量'+json_obj2.results[0].curedCount) console.log('死亡人数'+json_obj2.results[0].deadCount) that.updataShow(); }, complete:function() { console.log('request complete') }, fail:function(){ console.log('request failed') } }) }, // 更新UI 界面的数据 updataShow:function(){ console.log(">> updataShow" + "length="+json_obj2.length); var dataList = new Array(); var ProvinceItem = new Object(); ProvinceItem.cityname = {value :json_obj2.results[0].provinceName }; ProvinceItem.currentConfirmedCount = { value: json_obj2.results[0].currentConfirmedCount }; ProvinceItem.confirmedCount = { value: json_obj2.results[0].confirmedCount }; ProvinceItem.curedCount = { value: json_obj2.results[0].curedCount }; ProvinceItem.deadCount = { value: json_obj2.results[0].deadCount }; dataList.push(ProvinceItem); for(var i = 0 ; i < 20; i++) { var item = json_obj2.results[0].cities; console.log(item.cityName); var realdataItem = new Object(); realdataItem.cityname = {value : item.cityName}; realdataItem.currentConfirmedCount = {value : item.currentConfirmedCount}; realdataItem.confirmedCount = {value : item.confirmedCount}; realdataItem.curedCount = {value :item.curedCount }; realdataItem.deadCount = {value : item.deadCount}; dataList.push(realdataItem); } listPage.setData({listctrl1 : {empty : true}}); listPage.setData({listctrl1:{page : listPage, xml : "Panels/realdata", items : dataList, refresh:true}}) console.log("datalist refresh") },```***总结**刚开始入门学习柿饼派,深有体会的是柿饼派的 UI 真的挺方便的,上手很快,并且可以脱离板子,编译,下载,调试的苦恼,当然例如网络模块这些还是得依靠在板子上调试才可以,关于柿饼派的学习还得多熟悉文档提供的 api说明,还可以参考Persimmon UI Builder 里面帮助选项中的 online demo 中的炫酷示例进行学习。*
查看更多
11
个回答
默认排序
按发布时间排序
霹雳大乌龙
2020-02-29
这家伙很懒,什么也没写!
赞一个,可以把图片背景透明了,这样就不会显示一块块的背景,UI要好看最重要:P
xingchen8910
2020-03-01
这家伙很懒,什么也没写!
最近正在学这个,请问大侠两个http quest定时器怎么调用,一个定时器同时调用两个吗?
shadowliang
2020-03-02
Hello,world!!!
>最近正在学这个,请问大侠两个http quest定时器怎么调用,一个定时器同时调用两个吗? ... --- 可以用两个 timer 定时 http request ,也可以一个 timer 分别同时调用两个 http request,一个 http request 请求成功后再 调用 第二个 http request。
xingchen8910
2020-03-02
这家伙很懒,什么也没写!
>可以用两个 timer 定时 http request ,也可以一个 timer 分别同时调用两个 http request,一个 http requ ... --- 两种方法都尝试过,先说场景一个北京时间调用,一个天气调用,第一种,使用两个定时器--时间调用1s,天气调用3s,此时天气数据和时间数据均可显示,但是时间会在每隔3s的时候少显示1s,不知为何;第二种,使用一个1s定时器先判断天气http request成功后再调用时间请求,此时时间显示仍旧会少1s每隔1s就少显示1s,例:秒钟显示1,3,5,7...,如果是先判断时钟再调用天气,时钟显示正常,但天气数据要每隔10几秒钟才能请求成功1次,第一种情况如下图[attach]13879[/attach]
shadowliang
2020-03-02
Hello,world!!!
>两种方法都尝试过,先说场景一个北京时间调用,一个天气调用,第一种,使用两个定时器--时间调用1s,天气 ... --- 想知道你的时钟页面的更新也是通过定时 1s http request 北京时间,是请求成功后再更新页面的?你的情况有可能是页面更新不及时导致的?
DaZhou
2020-03-03
这家伙很懒,什么也没写!
牛逼啊
xingchen8910
2020-03-03
这家伙很懒,什么也没写!
>想知道你的时钟页面的更新也是通过定时 1s http request 北京时间,是请求成功后再更新页面的?你的情况 ... --- 定时器函数调用如下: wea_suc_flag是天气调用成功标志位,两个调用都是请求成功之后才刷新的页面,天气和时钟函数源自本主题作者‘[https://www.rt-thread.org/qa/space-uid-13463.html](shadowliang)’,具体可参照本帖内容 [attach]13896[/attach]
xingchen8910
2020-03-03
这家伙很懒,什么也没写!
>想知道你的时钟页面的更新也是通过定时 1s http request 北京时间,是请求成功后再更新页面的?你的情况 ... --- 没仔细看您就是本帖作者:loveliness:
shadowliang
2020-03-04
Hello,world!!!
>没仔细看您就是本帖作者 --- 我的例程中有一个定时 1s 的timer 作为本地时钟的计时器的,在没有网络的时候也可以正常跑时钟,有网络的时候会 1min 中同步一次网络时间和天气信息,疫情信息每 5 min 同步一次,我的示例运行目测没有出现明显的时间丢秒的情况。
xingchen8910
2020-03-04
这家伙很懒,什么也没写!
>我的例程中有一个定时 1s 的timer 作为本地时钟的计时器的,在没有网络的时候也可以正常跑时钟,有网络的 ... --- 谢谢老哥,懂了,时钟还是以本地计时为基础,网络做数据同步用
撰写答案
登录
注册新账号
关注者
0
被浏览
5.1k
关于作者
shadowliang
Hello,world!!!
提问
4
回答
100
被采纳
7
关注TA
发私信
相关问题
1
【PersimmonUI柿饼学习营】+ A Byte of China + 环境搭建&20W年薪广告
2
【柿饼学习营】+werrysuzhen+20W年薪作业
3
【PersimmonUI柿饼学习营】+ meetwit + 20W年薪广告&lesson01
4
【PersimmonUI柿饼学习营】+ DaZhou + 20W年薪作业+视频有彩蛋
5
【PersimmonUI柿饼学习营】+ DMY+ lesson01 20W年薪广告
6
【PersimmonUI柿饼学习营】+ Bigmagic+20W年薪广告&day01
7
【PersimmonUI柿饼学习营】+ chowguohua+年薪广告
8
【柿饼学习营】+werrysuzhen+脚本及事件学习
9
【PersimmonUI柿饼学习营】+ DaZhou+ 手把手教你做计算器
10
【PersimmonUI柿饼学习营】+ A Byte of China + 2048游戏
推荐文章
1
RT-Thread应用项目汇总
2
玩转RT-Thread系列教程
3
国产MCU移植系列教程汇总,欢迎查看!
4
机器人操作系统 (ROS2) 和 RT-Thread 通信
5
五分钟玩转RT-Thread新社区
6
【技术三千问】之《玩转ART-Pi》,看这篇就够了!干货汇总
7
关于STM32H7开发板上使用SDIO接口驱动SD卡挂载文件系统的问题总结
8
STM32的“GPU”——DMA2D实例详解
9
RT-Thread隐藏的宝藏之completion
10
【ART-PI】RT-Thread 开启RTC 与 Alarm组件
最新文章
1
RT-Thread 携手 Copilot:智能代码审查,加速开源协作
2
重磅预售!RT-Trace调试工具
3
基于RT-Thread的STM32F4开发第五讲——软件模拟I2C
4
关于vscode env gcc工具链下,使用其他下载器(cmsis-dap)的launch.json编写
5
新版OneNet的星火1号开发板例程适配(一)
热门标签
RT-Thread Studio
串口
Env
LWIP
SPI
AT
Bootloader
Hardfault
CAN总线
FinSH
ART-Pi
DMA
USB
文件系统
RT-Thread
SCons
RT-Thread Nano
线程
MQTT
STM32
FAL
RTC
rt-smart
I2C_IIC
cubemx
UART
ESP8266
WIZnet_W5500
BSP
ota在线升级
PWM
flash
packages_软件包
freemodbus
潘多拉开发板_Pandora
ADC
GD32
定时器
编译报错
flashDB
keil_MDK
socket
中断
rt_mq_消息队列_msg_queue
Debug
ulog
SFUD
msh
C++_cpp
at_device
本月问答贡献
出出啊
1524
个答案
343
次被采纳
小小李sunny
1444
个答案
290
次被采纳
张世争
821
个答案
179
次被采纳
crystal266
555
个答案
162
次被采纳
whj467467222
1222
个答案
149
次被采纳
本月文章贡献
Pai同学
7
篇文章
10
次点赞
RTT_逍遥
2
篇文章
8
次点赞
Rick98
1
篇文章
2
次点赞
河南理工大学恁带劲儿
1
篇文章
2
次点赞
加缪
1
篇文章
1
次点赞
回到
顶部
发布
问题
分享
好友
手机
浏览
扫码手机浏览
投诉
建议
回到
底部